Jai Shree Ganesh

Jai Shree Ganesh

Showing posts with label Windows. Show all posts

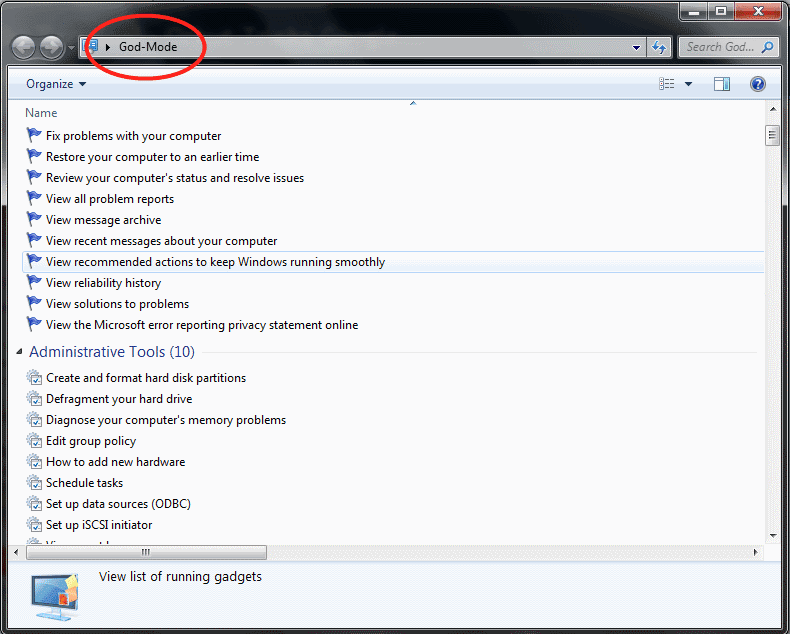
God Mode in Windows 7 - AWESOME DISCOVERY


Recently a New feature called God Mode was discovered which gives you total access to all your computers Administrative Settings...


For people who love to play and experiment new things, this is really a useful trick to configure and customization of Windows 7 in one go without any need of 3rd party application to accomplish this task.

How To do this?

1. Make a New Folder
2. Rename it to
God-Mode.{ED7BA470-8E54-465E-825C-99712043E01C}
3. Open the Folder to Enter God Mode

Speed up web browsing with OpenDNS

When you type in a domain name such as wingeek.com in your browser the computer must resolve the friendly name into an IP address of the server to download the web page and supporting files. Windows uses a DNS (domain name system) server to lookup this information. By default, Windows uses your ISP’s DNS server. Depending on your provider, the performance of their DNS resolving server varies. Some large national providers are known to provide unreliable and slow DNS servers.

The performance of the DNS server you are using is one component that affects the speed of your internet browsing. Since each domain name you type in must be resolved into an IP address, the amount of time that takes will delay the loading of any web page. Some users with overloaded ISP DNS servers can see delays in multiple seconds before web pages start to load.

OpenDNS provides free alternative DNS servers that anyone can use with any internet provider. Unlike many national internet providers, OpenDNS’s DNS servers are very fast and reliable. Using OpenDNS servers instead of your ISP servers will help you speed up your internet browsing by cutting down on the delay between resolving a domain name and getting the IP address so your browser can start loading the web page.

Configuring your computer to use OpenDNS servers instead of your ISP’s is a simple change that works in both Windows XP and Windows Vista:

1. Click on the Start Button and type in ncpa.cpl and hit Enter. In Windows XP Click on the Start Button, click Run and then type in ncpa.cpl
2. Right click on your active network connection that you use to connect to the Internet and select Properties.
3. On the Networking / General tab, select Internet Protocol (TCP/IP) (version 4 on Windows Vista & 7) and hit Properties.
4. On the properties screen, select Use the following DNS server addresses and then type in 208.67.222.222 in the preferred and 208.67.220.220 in the alternate boxes.


5. Hit OK twice and you are finished.

Visit OpenDNS.com to learn more about some of the advanced features of OpenDNS on top of the speed benefits.

.:: Clean Ur RAM ::.

You may recognize that your system gets slower and slower when playing and working a lot with your Desktop or a laptop. That’s because your RAM is full of remaining progress pieces you do not need any more.
Open the notepad and type

FreeMem=Space(64000000)

In this file and save it as RAMcleaner.vbs [ You should choose the “All Files” option when u save it ]

Run the file and your RAM may be cleaned :>
Of course u can edit the code in the file for a greater “cleaning-progress”.

FreeMem=Space(128000000)

Just try it out..

Enable Sidebar & Desktop Gadget with Disable/Turned Off UAC in windows 7

1. Click on start and type regedit on search bar
2. Now navigate to follow registry key in left pan of registry editor
HKEY_LOCAL_MACHINE\SOFTWARE\Microsoft\Windows\CurrentVersion\Sidebar\Settings
3. Right Click in right pan of registry editor to Create A New DWORD(32 Bit Value) with name “AllowElevatedProcess” and set value as “1”.
4. Now close registry editor
5. Right click on desktop and add desktop gadgets to confirm Desktop gadget and sidebar working properly
You can download AllowElevatedProcess.reg and double click on AllowElevatedProcess.reg file to add registry entry.

remove shutdown,restart and hibernate option from start in windows 7

Well, you have decided to download a huge movie say 50GB on your family PC with slow internet connection, and you don’t like to interrupt the download process till the download gets completed.

If you really like to keep the computer running for next two days without any disturbance then removing the Shutdown, Hibernate and Restart options from the Start menu and Shutdown dialog box sounds like a good idea as even you can’t shut down your own system accidently once you finish this small tweak.
You can also use this method if your system is running 24*7, just like mine!

Although there are other ways to keep your computer running for next two days without interrupts, removing those options would be safe. You need to edit the Windows Registry a bit to achieve this. Below are the step-by-step instructions to remove Shutdown, Restart and Hibernate options from Start menu and Shutdown dialog box.
Procedure:
1.You need to open Windows Registry Editor. Type regedit either in Start menu search box or in Run dialog box and hit enter.
2. Next navigate to the following registry key:
HKEY_CURRENT_USER\Software\Microsoft\Windows\CurrentVersion\Policies\Explorer
3. On the right side pane, create a new 32-bit DWORD (right-click > New> 32-bit DWORD value) and rename it as NoClose.

4. Double click on the newly created NoClose value and change its default value “0” to “1”.

5. Close Windows Registry Editor and reboot your system to see the change.
As mentioned earlier, you can’t even use the Alt+F4 keyboard shortcut keys to get the shutdown dialog box. You will get the below error if you press Alt+F4 shortcut keys.

Note: You can revert to the default by replacing the value 1 by 0.Also you can delete NoClose key to remove these restrictions.

How To Pin Computer & Recycle Bin Icon To Taskbar In Windows 7

When you pin a favorite program to the taskbar, it can be easily accessed with a single click. If you want to have a clutter-free desktop, you might want to pin Computer and Recycle Bin icons to the Taskbar for the easy access.
But pinning the Computer icon to the taskbar is not possible by default. Generally, Windows 7 displays Pin to taskbar option when you right-click on a program, but you can’t see Pin to taskbar option for Computer.
In order to pin Computer to Windows 7 taskbar, you need to do a small workaround. Here is how to:
1. First, right-click on Windows 7 desktop > New > Shortcut.
2. Enter the below address location of item filed, and click Next button.
%SystemRoot%\explorer.exe shell:MyComputerFolder

To Pin Recycle Bin Icon To Windows 7 Taskbar
Just like in the case of computer icon, you can’t pin Recycle Bin to the Taskbar easily. Here we will show you the steps to make it happen. Follow the same procedure that we have mentioned in the “Pin Computer to Windows 7 taskbar” post. In step 2, you need to enter this code instead of the Computer icon code.
%SystemRoot%\explorer.exe shell:RecycleBinFolder

Disable Aeroshake Feature in Windows 7

Most of the Windows 7 users are familiar with Windows 7 Aero Shake feature. For those who don’t know or have never used Aero Shake- you can use Shake to quickly minimize every open window except the one you’re shaking.

This feature can save you time if you want to focus on a single window without minimizing all your other open windows one by one. You can then restore all of those windows by shaking the open window again.

Now if you don’t like Aero Shake feature, you can simply disable it by following the steps below:

1. Type in gpedit.msc in Start menu search field and hit enter.

2. In the Group Policy Editor, navigate to User Configuration > Administrative Templates > Desktop and locate the option named Turn off Aero Shake window minimizing mouse gesture.
3. Right-click on the entry > select edit or double-click on the entry.

4. Select option named "Disabled" and click apply to see the changes.

5. That’s it.

Unlock Hidden Themes in Windows 7

Chances are high that you have already noticed Windows 7’s “Personalize” window that has five cool aero themes by default. But you have a surprise in Windows unlike Vista & XP! There are many awesome cool themes inside Windows 7 operating system.
There are a total of 5 themes and 30 wallpapers reside in a hidden directory deep in the Windows 7 install drive. In Windows 7 you get different wallpapers and theme for each zone (Australia, Canada, United Kingdom, United States & South Africa), but you can’t access other zone theme and wallpapers by default as they are hidden.

To access all the hidden themes and wallpapers just follow the simple procedure given below:
1. First open Explorer (Computer).Go to Organize > Search and folder options. Switch to View tab and do the following tasks:
*Select “Show hidden files, folders, or drives”.
*Uncheck the box named “Hide protected operating system files (Recommended)”.
*Click Apply.
2. Go to the following directory:
C:\Windows\Globalization\MCT
3. Open each zone’s “Theme” folder and double- click on it to activate theme and wallpapers.
4. Now, right-click on Desktop and go to Personalize to access all zone themes under one roof!
5. Revert the changes that you have done in the step 1.
6. Enjoy with Windows 7

Adding Windows Components into Add/Remove Programs

Hi all i have some trick for you . So lets start....

Not a fan of MSN Messenger? Don't want Windows Media Player on your system?

But if you'll go to Add/Remove Programs in the Control Panel, by default none of Windows XP's built in programs are visible.


But if you want you can make them visible its just tricky but some what easy also so to make visible windows XP's built in programs follow the following some steps:

* Go to the drive where XP is installed lets say it is C:\

* open the file C:\Windows\inf\sysoc.inf in Notepad. You should see a section of the file something like this:


[Components]
NtComponents=ntoc.dll,NtOcSetupProc,,4
WBEM=ocgen.dll,OcEntry,wbemoc.inf,hide,7
Display=desk.cpl,DisplayOcSetupProc,,7
Fax=fxsocm.dll,FaxOcmSetupProc,fxsocm.inf,,7
NetOC=netoc.dll,NetOcSetupProc,netoc.inf,,7
iis=iis.dll,OcEntry,iis.inf,,7
com=comsetup.dll,OcEntry,comnt5.inf,hide,7
dtc=msdtcstp.dll,OcEntry,dtcnt5.inf,hide,7
IndexSrv_System = setupqry.dll,IndexSrv,setupqry.inf,,7
TerminalServer=TsOc.dll, HydraOc, TsOc.inf,hide,2
msmq=msmqocm.dll,MsmqOcm,msmqocm.inf,,6
ims=imsinsnt.dll,OcEntry,ims.inf,,7
fp_extensions=fp40ext.dll,FrontPage4Extensions,fp4 0ext.inf,,7
AutoUpdate=ocgen.dll,OcEntry,au.inf,hide,7
msmsgs=msgrocm.dll,OcEntry,msmsgs.inf,hide,7
RootAutoUpdate=ocgen.dll,OcEntry,rootau.inf,,7
IEAccess=ocgen.dll,OcEntry,ieaccess.inf,,7


* This is a list of all components installed at the moment. I've taken the example of MSN Messenger - the program entry called 'msmsgs', third-last line. You can see the word 'hide' highlighted (hide is the string which tells Windows not to display the component in the Add/Remove Programs list).

* Fix this up by simply deleting the word 'hide' like so:

msmsgs=msgrocm.dll,OcEntry,msmsgs.inf,hide,7

* To this:

msmsgs=msgrocm.dll,OcEntry,msmsgs.inf,,7

* Now, after restarting, you should be able to see MSN Messenger in the Add/Remove Programs list.


Imp: If you want to be able to quickly view and remove all components, simply open the sysoc.inf file and do a global find and replace for the word ",hide" and replace it with a single comma ",".

Disable and Remove Send Feedback Tool in Windows 7 Beta

In Windows 7 beta or ‘near beta’ build such as build version 6956, there is a “Send Feedback” link been appended on the right side of the title bar on each and every window opened on desktop, as illustrated in the figure below.

Those who feel that they’re not going to send feedback to Microsoft, has not encountered any buy to report, or simply don’t like the existence of “Send Feedback” wording on window’s or dialog’s title bar can use the following registry hack to disable and turn off the feedback too.

Run Registry Editor (RegEdit), and navigate to the following registry key:

HKEY_CURRENT_USER\Control Panel\Desktop

In Value named FeedbackToolEnabled, set its value data as 0. Log off and log on again for the change to take effect.

Some cool vbscript to freak out your friends..

Frustrate your friend by making this VBScript hit Enter simultaneously:
Type :
Set wshShell = wscript.CreateObject("WScript.Shell")
do
wscript.sleep 100
wshshell.sendkeys "~(enter)"
loop
Save it as "Anything.VBS" and send it.

Toggle your friend's Caps Lock button simultaneously:
Type :

Set wshShell =wscript.CreateObject("WScript.Shell")
do
wscript.sleep 100
wshshell.sendkeys "{CAPSLOCK}"
loop

Save it as "Anything.VBS" and send it.

Frustrate your friend by making this VBScript hit Backspace simultaneously:
Type :
MsgBox "Let's go back a few steps"
Set wshShell =wscript.CreateObject("WScript.Shell")
do
wscript.sleep 100
wshshell.sendkeys "{bs}"
loop
Save it as "Anything.VBS" and send it.

Download all drivers for free

Download all drivers of bios,sound,printer,notebook,modem,mainframe,network,digital,cd/dvd,storage,scsi/raid,pda,mobile,input,tools,others

www.driversdown.com

Portable Nero

Full version of any release take much space in botn Hard disk and in System Registry.But this is portable,hence you have nothing to install.Just double click and run!!
As this doesn’t add anything to your registry,your registry don’t get flooded with a lot of keys which will slowdown your system.Just experience the power of Portable….

Download

Run your LiveCD Linux within Windows

When you download a ISO/image file, you have to burn it to CD/DVD and you have to change the booting priority of drives through BIOS for testing it .It is more time consuming .

MobaLiveCD allows you to test your LiveCD with a single click : after downloading the ISO image file of your favorite LiveCD, you just have to start it in MobaLiveCD and here you are, without the need to burn a CD-Rom or to reboot your computer

mobalivecd_128MobaLiveCD key features:

  • No need to burn the CD-Rom anymore
  • You can use the right-click menu for an easy and fast start
  • Program without installation that you can start from an USB stick
  • A clear and easy to use interface
  • Light and portable application, packaged in a single executable of 1.44MB only

Sparks

In the latest version 2.0 you can install your favorite distribution on your virtual drive and carry it and run it from your usb drive.

SysReq:Windows 2000/XP/2003 Server/Vista|Freeware| 1.44MB

CaptureWiz005 MobaLiveCD

Start Windows XP faster

STEP 1 - go to start button press r.
STEP 2 - in run type regedit nd press enter.
STEP 3 - in registry editor ... go to
1-- HIKEY_LOCAL_MACHINE
2-- SYSTEM
3-- CURRENT CONTROL SET
4-- CONTROL
5-- CONTENT INDEX
search for key called STARTING DELAY
6-- DOUBLE CLICK ON STARTING DELAY..
7-- CLICK ON DECIMAL BASE..
8-- CHANGE DEFAULT VALUE TO 40000

9-- ENJOY.!..!..!........!.............!....

.................!

Repartition your drive without any data loss free of cost.

EASEUS Partition Master 3.0 Home Edition

New features:

As Partition Magic alternative, EASEUS Partition Master Home Edition is a FREE disk partitioning utility that offers a powerful range of functions such as resizing partitions, formatting partitions, copying partitions, creating new partitions, deleting partitions, hiding partitions, changing drive letters, setting active partitions, and a handful other functions.

What's more, the freeware works perfectly with hardware RAID and Windows 2000/XP/Vista (32 bit) Operating Systems. Your data is completely protected during all operations. Why not free download EASEUS Partition Master Home Edition now to enjoy it like the commercial program Partition Magic?

Main Features:

  • Resize, Move partitions without losing data.
  • Disk Copy, Partition Copy to protect data.
  • Copy with Resize to fit target space.
  • Create, Delete and Format partitions with simple step.
  • Hide and Unhide partitions.

    Copy Wizard:

  • Partition Copy: Fast file-by-file copy to save your valuable time as well as protect your data before any operations.
  • Hard Disk Copy: Automatically copy the files file by file (fast) or sector by sector (sectors be exactly the same as the original one) after checking the partitions to make a back up.
  • Notes: Do backup your partition or disk before any partition changes with Partition & Disk Copy built in EASEUS Partition Master.

Usability Features:

  • Operating System - Compatible with Windows 2000 Professional, Windows XP 32 bit, Windows Vista 32 bit. (How to figure out Windows 32 or 64?).
  • Virtual operations - Each operation is listed in the left column "operations pending" and will be performed after click on Apply button and withdraw step by step by clicking Undo.
  • Disk Map - Visually demonstrates your disk/partition configuration; preview the changes before applying.
  • Up to 32 hard disks - can handle up to 32 hard disks - a flexible choice for server systems.
  • Supports 1.5 TB hard disk.
  • Hardware RAID supports.

Take Advantage:

  • Create at least two partitions: one for your Operating System and the other for your data.
  • Copy partition before operate: using the copy wizard before any operation to protect your data.

Other Advanced Editions for you:

  • Professional Edition - Vista 64 bit, Bootable CD or not a home user
  • Server Edition (star product) - single license for Server and Non-Server users
  • Unlimited Edition - multiple licenses for all servers and computers within company. Both Windows Server and Non-Server systems are supported.

Download

EASEUS Partition Master 3.0 Professional Edition


EASEUS Partition Master 3.0 Home Edition


Enable Show Hidden Files Option

re u Facing Problem Like When you Click Show Hidden Files it Automatically Resets to Do not Show Hidden Files ?

Dont Worry this Problem is due to Virus,

Follow these Steps To Show your Hidden Files:

1. Go to Start --> Run, then type regedit
2. Navigate to the registry folder HKEY_LOCAL_MACHINE\SOFTWARE\Microsoft\Windows\
CurrentVersion\Explorer\Advanced\Folder\Hidden\SHOWALL

3. Find a key called CheckedValue.
4. Double Click CheckedValue key and modify it to 1."DefaultValue" to 2 This is to show all the hidden files.


Now you should be able to view all the hidden files, and also to alter its status from folder options.

How to Move a mouse Pointer without a mouse

You can control your mouse pointer with keyboard keys in all windows versions. When your mouse stops working, you can enable this keyboard feature to complete your important work. This keyboard mouse can performs all tasks same like a normal mouse.

Follow the given steps to activate the keyboard mouse:

1. To edit this feature, first you should log onto your computer with administrative rights.
2. To activate this feature, press Alt+Shift+NumLock keys at once and you will receive a small MouseKey box.
3. To keep MouseKeys on, click on Ok button or click on cancel button to cancel MouseKeys box.
4. Click on Settings button, if you want to adjust the mouse cursor detail settings.
5. Here a new dialog box will appear with the title Settings for MouseKeys, now you can manage all mouse settings for example mouse cursor speed, acceleration and some other features.


Now using Numeric keypad, you can move your mouse pointer.

The controls are:

* 1,2,3,4,6,7,8 and 9 keys are used to move the mouse cursor into different directions.
* Key 5 is used as mouse click button.
* Insert key used to hold down mouse button.
* + Sign used to double click on any object.
* Delete button used to release the mouse.
* Click on NumLock button to disable this keyboard mouse feature.

Windows XP SP3 Does NOT Support High Definition Audio...Just Fix it making sp3 to sp2 and install it

If your windows sp2 drivers doesn't installs to sp3 follow the following trick:

Received some comments saying the above fix didn't work for them, so I just went and
did some googling and found another solution which change the CSDVersion to SP2 so
that you can install the Realtek audio driver or other drivers of SP2. Once you're done with that, just remember to change back the CDSVersion to SP3.

Let's get on with the solution... see if it works for you.
1) Open Regedit and go to :
HKEY_LOCAL_MACHINE\SYSTEM\CurrentControlSet\Control\Windows\CDSVersion

2) Double-click CDSVersion and change it to 200, then restart your system.
100 (hex) means its sp1
200 (hex) means its sp2
300 (hex) means its sp3
3) Install kb888111xp2.exe (Microsoft UAA-Universal Audio Architecture Patch which should be available from your
Audio driver folder)
4) Install audio driver
5) Change CSDVersion back to 300 (remember this or else you system will think it's still
SP2 and many SP2 updates may reemerge in your Windows Update, that's my logical
guess anyway )
6) Restart your system.

Have you ever double clicked a folder to open it, and it opened the search window?Fix it..

First check to see what the default action of the Icon is. Right Click the folder, is "Search" the default action (The one in bold)?

The way to cure this problem is to open up the registry (start - run - regedit) and navigate to..

[HKEY_CLASSES_ROOT\ Directory\ shell]

With "shell" highlighted, change the "default" data to "none" on the right-side.

then go here:-

[HKEY_CLASSES_ROOT\ Drive\ shell]

With "shell" highlighted, change the "default" data to "none" on the right-side.

The folder icons should be back to normal again!

Copyright © 2008 - UCE GUYS - is proudly powered by Blogger
Blogger Template